
What You’ll Learn:
- How to use Self Assessment Forms for data capture.
- Automating chasers to save time and reduce manual follow-ups.
- Strategies for best practices during Self Assessment season.
- Step-by-step guides for creating forms and templates.
Forms for Data Capture
At Engager, our mission is to simplify processes and make your workflow more efficient. That’s why we’ve developed a customisable Self Assessment Form. This tool helps you gather all the necessary information from your clients quickly and easily.
Key Benefits of Engager Forms:
- Fully customisable: Tailor forms to suit your needs.
- Client-specific flexibility: Create tailored forms for individual clients or use a generic template.
- Automated processes: Save time by reducing repetitive tasks.
New to Forms? Read How To Use Forms to learn more about setting them up and customising them for your clients.
Sending Forms to Clients
Once your Self Assessment Form is ready, you can send it to clients in two ways:
1. Sending Forms Individually
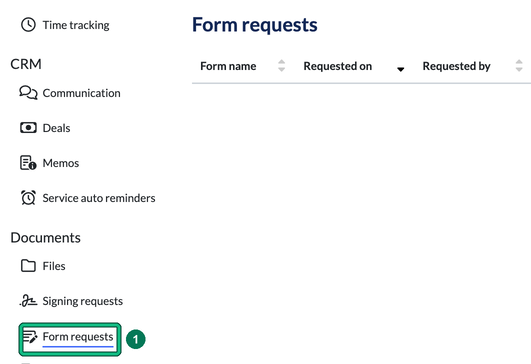
- Open the client from Clients and select Form requests under Documents on the left menu.
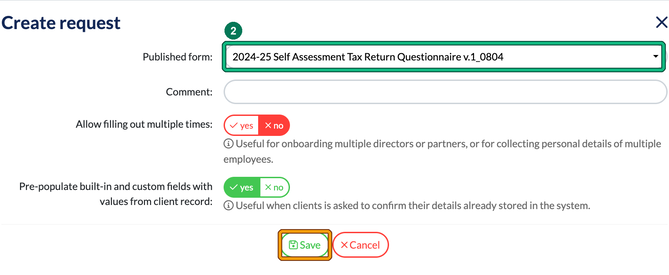
- Select + new request. In Create request, choose your Self Assessment form in Published form: and select Save. The request is saved as Pending. Saving doesn’t tell your client about it.
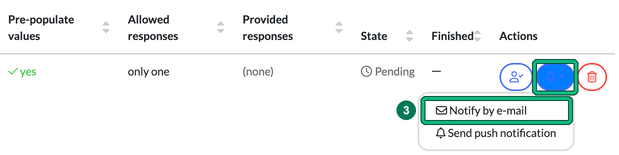
- To send it to the client, select the bell button (notify client) in the Actions column and choose Notify by e-mail (or Send push notification).
2. Sending Forms in Bulk
For a more time-efficient approach, send forms in bulk. Here’s how:
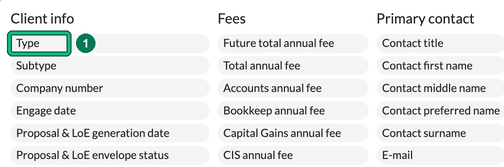
- Filter Your Client List: go to Clients (the All clients page), select filters, then select Type under Client info.
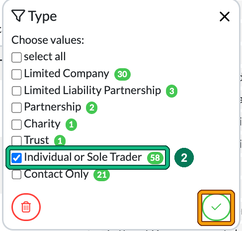
- Filter by Type (for example, individuals or limited companies): tick the values you want, such as Individual or Sole Trader, then select the tick to apply.
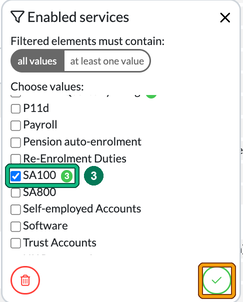
- Filter by Enabled services, selecting SA100, then select the tick to apply.
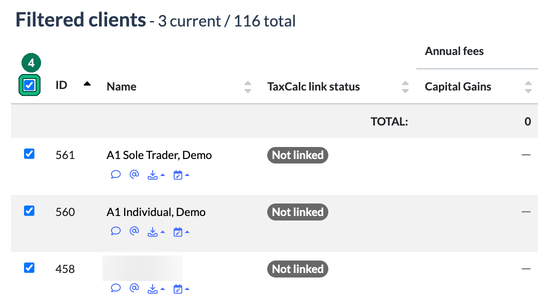
- Select Clients: once your filters are applied, the list will display only clients with the Self Assessment service enabled. Use the top-left checkbox to select all filtered clients.
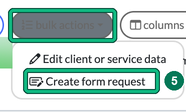
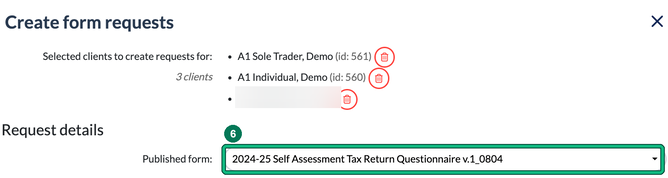
- Create Form Requests: click bulk actions in the top-right corner and choose Create form request. This opens the Create form requests dialog.
- In the Published form field, select the Self Assessment form you want to send.
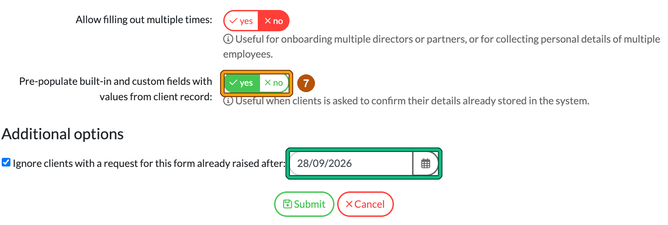
- Adjust Settings: check that Pre-populate built-in and custom fields with values from client record is set to yes (it is by default) to streamline form completion for your clients. Ignore clients with a request for this form already raised after: is ticked by default, with a date one week earlier. Change the date if you need to, to avoid sending forms to clients who already received one after that date. Then select Submit.
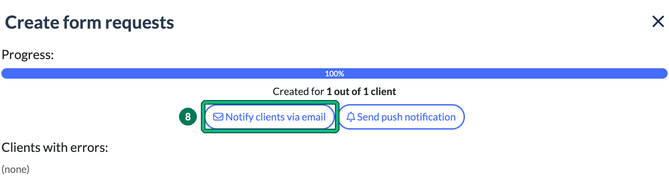
- Notify Clients: after submitting the form requests, notify clients via email by selecting Notify clients via email.
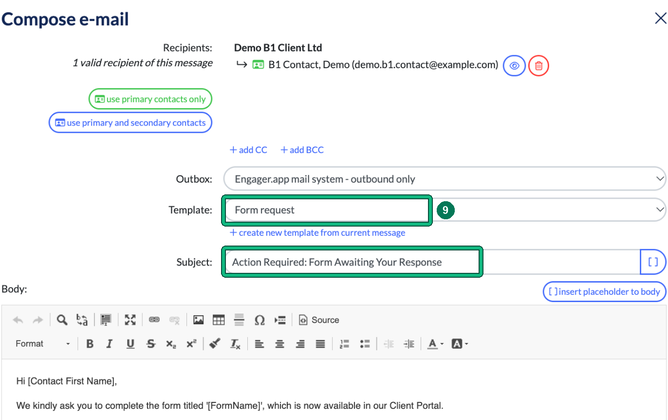
- Compose your email, and you can even include instructions for uploading details about self-employed earnings, expenses, or property income. The Form request template is chosen for you. Send the Emails: hit Send, and you’ve successfully emailed your entire Self Assessment client base in just minutes!
Key Takeaway: Bulk sending saves significant time, allowing you to reach all your Self Assessment clients in minutes.
Monitoring and Following Up
Once clients start completing forms, you’ll receive instant notifications within Engager. To manage and review responses effectively:
-
Use Grouped Notifications:
- Select the notifications bell at the top of the screen, then show grouped summary.

- On Notification summary, use the Client finishes and submits a form request widget to see responses.
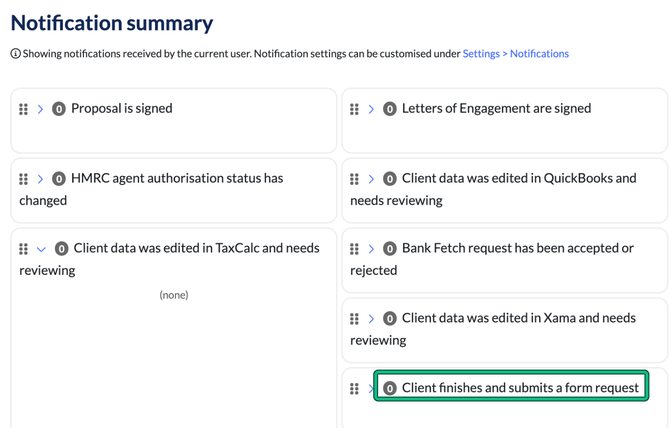
- Select the notifications bell at the top of the screen, then show grouped summary.
-
Track Pending Requests:
- Use the Form Requests dashboard widget to monitor pending submissions. If you can’t see it on your dashboard, select the gear, choose Manage dashboard and select the eye icon next to Form Requests.
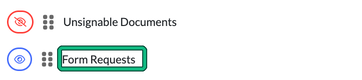
- Click on the pending requests (for example, 14 pending) to view clients who haven’t completed their forms.
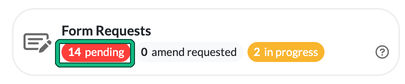
- Use the Form Requests dashboard widget to monitor pending submissions. If you can’t see it on your dashboard, select the gear, choose Manage dashboard and select the eye icon next to Form Requests.
-
Send Email Reminders:
- Select the email button in the Actions column next to pending clients to send follow-up reminders.
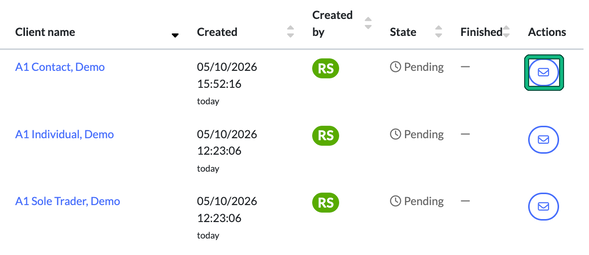
- Select the email button in the Actions column next to pending clients to send follow-up reminders.
Key Takeaway: Use grouped notifications and the dashboard widget to track pending responses at a glance.
Automating the Chasing of Forms
Let’s take it a step further by automating follow-ups for uncompleted forms. With Engager, you can build this process into your SA100 Service using Phases and Global Auto Reminders. For more on each, see Workflows, Phases and Checklists and Setting Up Automated Emails / Global Auto Reminders.
Step 1: Draft a Reminder Email Template
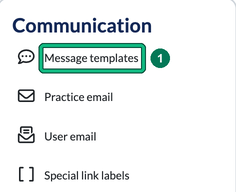
- Go to Settings and, under Communication, select Message templates. Select + new template and create an email template for reminders.

Example template:
Subject: Response Required to Complete Your Tax Return
Body:
Hi [Contact Pref Name],
We recently requested that you complete a form for your Self Assessment income for the tax year ending 5th April 2026.
Please click the link below to complete the form at your earliest convenience:
[PortalAddress]
The filing deadline is 31st January 2027, and HMRC will issue penalties plus interest for late filings.
We aim to complete your return by [InternalDeadline].
Thanks,
[Manager]
Step 2: Add Phases to the SA100 Service
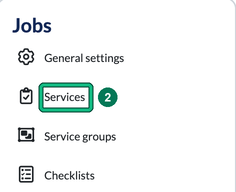
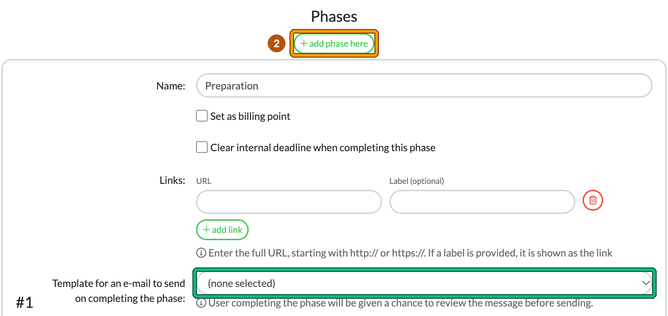
- Go to Settings and, under Jobs, select Services. Select the pencil icon in the Actions column for SA100 to open Edit service. Under Phases, select + add phase here and add a Phase (e.g., Request Records/Forms) to track client responses.
On the subject of phases, at this point you may want to update yours. We highly recommend keeping phases high-level and using 'Checklists' for more granular actions. For example your self-assessment phases could be:
- Obtain Records / Forms
- Preparation
- Internal Review
- Send to Client for Approval
- Filing with HMRC
Once you've decided on phases, you can also decide whether or not to send an email once each individual phase has been complete. You can select which email template should be sent within the Template for an e-mail to send on completing the phase field. The user completing the phase will be given a chance to review the message before sending.
You could have various emails being sent to your client once phases have been complete. For example:
Obtain Records / Forms: notifying them once the first phase is completed, that 'Preparation' has started and that you aim to have it completed within a certain timeframe.
Send to Client for Approval: an easy way to make a process consistent. You could have sections that need editing in order to allow for additional commentary. Also, you'll be able to attach documents to the email for review, or alternatively, provide a link to the portal.
Filing Process: an easy way to keep your client in the loop with the status of their tax return and provide an excellent service. You could even attach your invoice to this email if you were billing on completion.
Step 3: Configure Global Auto Reminders
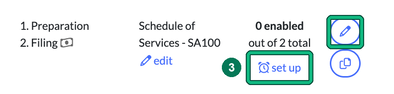
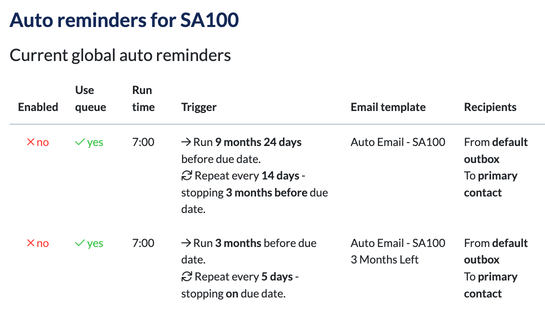
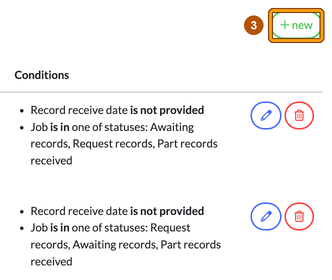
- In the Services list, find the SA100 row and select set up in the Global auto reminders column. Auto reminders for SA100 lists your current global auto reminders. Select + new.
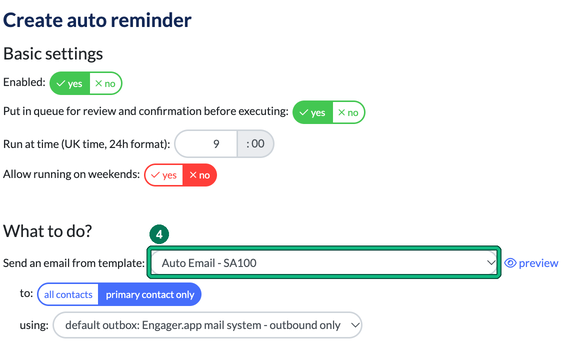
- In Create auto reminder, under What to do?, select the reminder email template you created earlier in Send an email from template:.
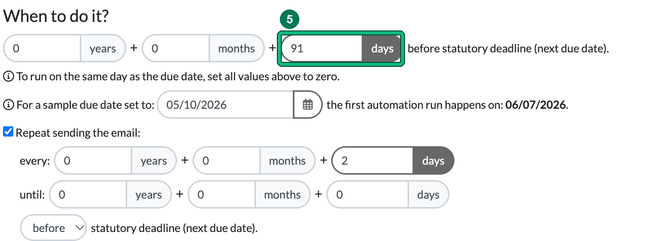
- Under When to do it?, define when the email should trigger (e.g., 91 days before the statutory deadline). You can also tick Repeat sending the email:.
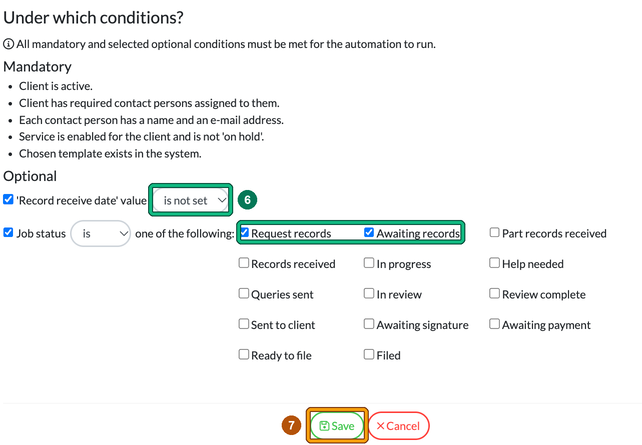
- Set Conditions: under Under which conditions?, specify the conditions for sending reminders (e.g., 'Record receive date' value is not set and Job status is Request records or Awaiting records).
- Save and Activate: select Save to save the automation.
Engager will now automatically send reminders based on your configured schedule and criteria.
Key Takeaway: Automation ensures no client is missed and reduces the need for manual follow-ups.
Filing Process & Payment Reminders
Once you’ve filed your client's Self-Assessment Tax Return (SATR), what should you do next? A common follow-up step is to send an email confirming the filing and advising the client to pay their tax liability to HMRC by 31st January.
When building your ‘Self-Assessment Filed’ email template in Engager, consider including some key details to provide clarity and guidance for your clients:
- Tax payable: The exact amount the client owes.
- UTR number: Their Unique Taxpayer Reference, required for making payments.
- Payment on Account (POA): Explain what it is, why it’s due, and the amount owed for the July POA (if applicable).
- How to pay: Include instructions or links to payment methods.
Creating a Self-Assessment Filed Email Template
When designing this email template, use Placeholders to automatically populate client-specific information. Investing a little time here will save you significant effort later and ensure exceptional client communication.
For some practices, you may need to create Custom Fields to capture details like January and July payment amounts (see Using Custom Fields). Here’s how:
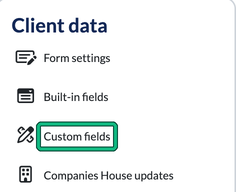
- Go to Settings and, under Client data, select Custom fields.
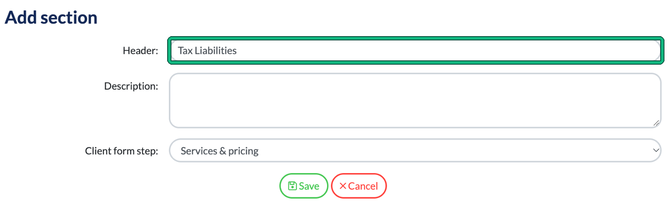
- Select + new section at the bottom of the page and create a section with the Header: Tax Liabilities, then select Save.
- In that section, select + new field and add fields for January Payment and July Payment amounts. For amounts, choose the Number with decimal places data type.
Capturing Payment Information
While setting up Custom Fields, why not take it a step further? Add two additional fields to track whether payments have been made:
- January Payment Made (Yes/No)
- July Payment Made (Yes/No)
There’s no Yes/No data type, so set Data type: to Dropdown choice and use + add under Choice options: to add a Yes option and a No option.
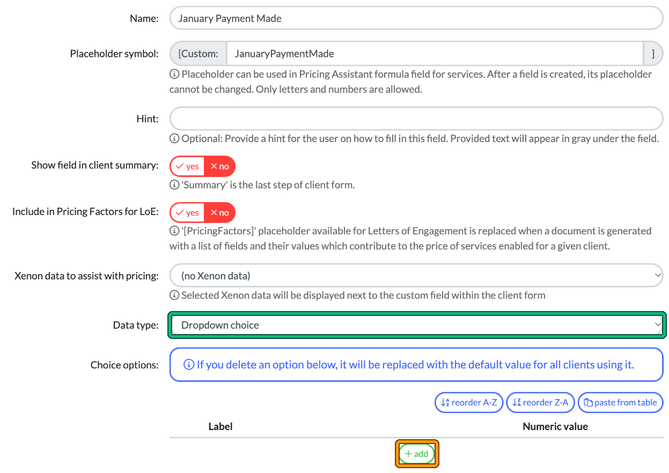
This allows you to check client payments against their HMRC account or gateway records, helping you stay on top of liabilities.
Streamline Your Workflow
To use your new ‘Self-Assessment Filed’ email template effectively, you’ll need to update each client’s record with their tax liabilities. Build this into your SATR filing process for consistency. You can add this step to your workflow using a Checklist or Phase within Engager.
Example Workflow:
- File the return using your production tool.
- Update the client’s record in Engager with January and July payment liabilities.
- Send the ‘Self-Assessment Filed’ email.
To add these as checklist points, go to Settings and, under Jobs, select Checklists. Select edit on the service to open Edit checklist, use + add point under Sections & points, then select Save new version from points above.
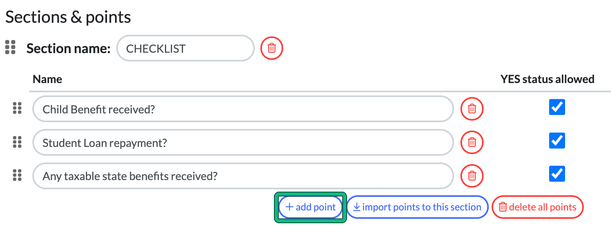
Once you’ve stored the liabilities, send the self-assessment filed email to the client, including the January and July payment details.
July Payment on Account Reminder
To further assist your clients, create a July Payment on Account Reminder email template. Once you’ve stored the July POA amount in Engager, you can remind clients in June/July about their upcoming payment.
Steps to Build the Reminder:
- Create a new email template for July POA reminders.
- If you created a custom field to store the POA amount, then use a placeholder within the email.
- Include a note such as: “Please ignore this message if you’ve already made the payment."
Scheduling the Reminder:
- Create a Task to remind yourself to send the email in bulk to your SATR clients.
- Go to Jobs and select + create task. In Create single or multiple tasks, fill in the Name:, Staff: and Deadline:, set Priority: to High priority, and press Save.
This task will appear on your dashboard, ensuring you don’t miss it.
Segmenting Your Self-Assessment Client List
You can take this process further by segmenting your Self-Assessment client list. For example:
- Use Custom Fields to track payment status for January and July POA.
- On the Clients list, filter by SA100 using filters > Enabled services (as in the bulk sending steps above), then use the columns menu to add your payment custom fields as columns, so you can pick out the clients who haven’t made their payments.
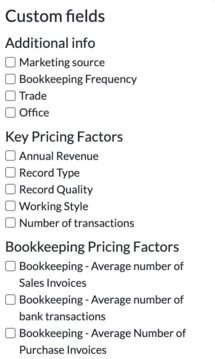
If you have access to their HMRC account or receive HMRC post on their behalf, you can update their payment status in these fields. This ensures you’re only following up with clients who haven’t yet paid.
By tracking January and July POA payments using Custom Fields, you'll be able to filter clients who haven’t made their July payments. This allows you to target only those who need reminders, saving you time and avoiding unnecessary follow-ups.
Providing Exceptional Client Care
With Engager, you’re equipped to handle Self Assessment season with ease. From custom forms to automated reminders and detailed payment tracking, our tools streamline your processes and ensure no client is left behind. Ready to experience seamless Self Assessment management? Start using Engager today.
Summary: Your Self Assessment Toolkit
Here’s how Engager simplifies Self Assessment season:
- Forms: Collect client information with customisable templates.
- Reminders: Automate chasers to save time and improve client responsiveness.
- Payments: Track liabilities and send personalised payment reminders.
With Engager, you’ll stay organised, meet deadlines, and provide exceptional client care.