
In this deep dive we take a look at how services, phases and checklists work in Engager. These are the key steps in workflows, and in this video we show you how to use each section and give you examples of how to use them.
Workflows
We know how important it is to map out your workflows for each Job that you do. Whether that's migrating existing workflows from other practice management software, or starting afresh and creating your IDEAL, the Engager app wants to know this.
Once we know your way of doing things, you'll be firing on all cylinders, keeping your jobs on track and triggering emails to customers or notifying other team members that it's their turn to complete their component of the work.
Terminology is key
If you've used other Practice Management software, you'll realise we all have our quirks and terms for different things. Effectively, we are all quite similar, it's just understanding what we call one thing versus another.
We do our workflows like this. It starts with a Phase, which is effectively a step. There could be a huge amount going on in each step / phase that you want to stay on top of, so to have it and track it at a more granular level, we have a checklist.
So, a Phase / Step could be the production of a set of accounts, but the HOW you produce a set of accounts, that's managed by a Checklist, as it's a much more granular review. This is how we operate.
At the end of every Step / Phase, we give you tools to message a client on completion. A great way to utilise this could be after somebody in the team has completed Phase: Accounts Production, why not email the client to give them an update?
'We've now completed the production of your accounts and they've now gone for Review by our Senior Accountant. You will have these in X days'
It's a great way to have that touch point with your client and it should also keep them from phoning you, demanding an update.
So before you start to build your phases / steps, have a think about what's the absolute ideal way for you to provide your services, get it written down and then mapped into Engager using Phases / Steps & Checklists.
Building a Phase / Step
Head to Settings > Jobs > Services and find your service. Select the pencil icon in the Actions column to open Edit service.
The defaults will be relatively basic, so Preparation then Filing. In your firm, you’re likely to have ‘send request for records’, ‘YE Production’, ‘YE review’, ‘Send for review’ and so on. Everybody’s workflow is going to be different and completed by different team members, so tell the system. Scroll down to Phases and select + add phase here.
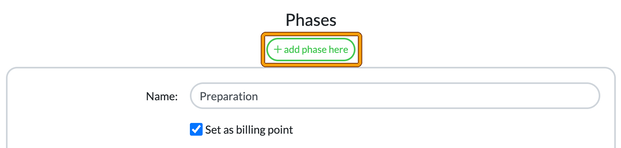
Each phase has its own settings, including Links: (add a URL and an optional label with + add link) and Update status on completion to:, which changes the job’s status when the phase is completed.
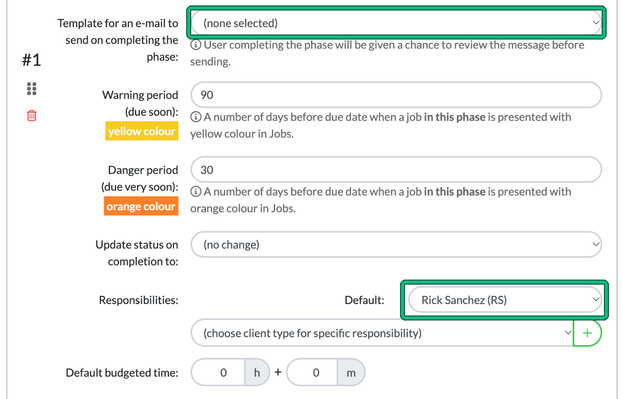
Template for an email
In Template for an e-mail to send on completing the phase: you can trigger a pre-written email template to the client. So when you hit complete on a phase, you'll be prompted to send an email to the client to build that touch point. You can always customise the email as it's being sent too: as the setting says, the user completing the phase will be given a chance to review the message before sending.
This is how it looks on the job: you can see the envelope icon before the phase name to denote that an email will be triggered. Hit complete current.
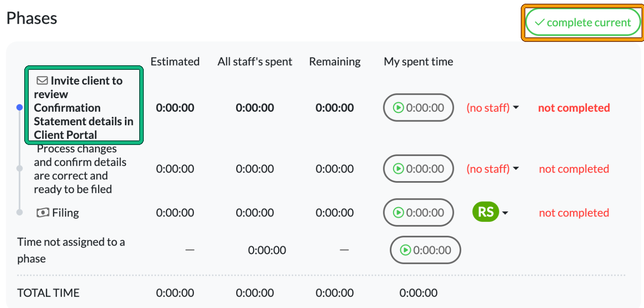
We give you the option and then you'll be presented with the compose email screen. Select your template, make amends if you need and out the door it goes.
If you have a team
When you are creating your Phase / Step, you can even set a default for responsibilities (Responsibilities: > Default:). Great if you have a hierarchy of Juniors / Seniors, so Jnrs on record requests / production / sending for approval etc, keeping the SNRs free for Reviews etc.
Remember, if you're ever unsure as to who is responsible for the phase, you can check the job itself, or come back into your settings for the defaults.
You can also budget time for every phase too (Default budgeted time:), to keep an eye on performance / billing etc.
Now you have the basic knowledge to go and build out a few more of your essential services. Remember, Phase is your Step, Checklists are there to manage the granular and track against the work itself.
So what is a Checklist and why use them
A Checklist is exactly what you think it is, a Checklist. It’s there for you or a member of your team to work through a process one by one, ticking off boxes methodically and without missing any critical steps.
A Checklist acts almost like a sanity check for the jobs that you need to do.
Imagine you’re filing your 37th Self Assessment for that day in January. You’re about to mark the job as complete but then the Checklist grabs you and forces you back into that Self Assessment. Maybe you’ve missed something, maybe the Client actually had some Self Employed income that year. You’ve been on auto-pilot but the Checklist has acted as your safety net here. Phew!
Similarly, Year End: you could have Juniors working through preparation and production on a set of accounts, and you want them to follow YOUR way of doing things. Write these down in the form of a Checklist, one by one, helping your staff member to be compliant and build confidence moving forwards.
What’s the difference between a Phase and a Checklist? Checklists act as your more granular level of control, versus a job phase.
When a Phase changes, it can trigger an email to a client. Keeping the Year End theme going, when a job’s status moves from ‘awaiting records’ to ‘records received’ as an example, that status change can fire an email to a client to say ‘Hey, thanks for your information, we’ll aim to have the accounts completed within x weeks. We’ll let you know when they’re being reviewed’.
So Phases can trigger emails to clients, Checklists are your internal measures and controls.
Want to learn how to trigger emails based off of status changes? We’ve got you covered: Setting Up Status Emails.
Checklists sound great, where are they?
They are quite innocuous when you’re on the job itself, but in the below, you can see where you can complete the Checklist: Checklist: on the job, with its progress and a + button.
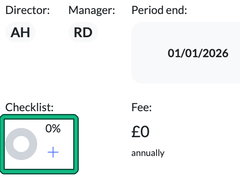
I love Checklists, how do I make one?
Head on over to your Settings as usual, and on the left-hand side select Jobs > Checklists. This opens Service Checklists.
Because we’re such a thoughtful bunch, we’ve created a whole series for you to play with, or you can even start over from scratch. Each service shows its generic checklist with an edit button, or + create if it doesn’t have one yet.
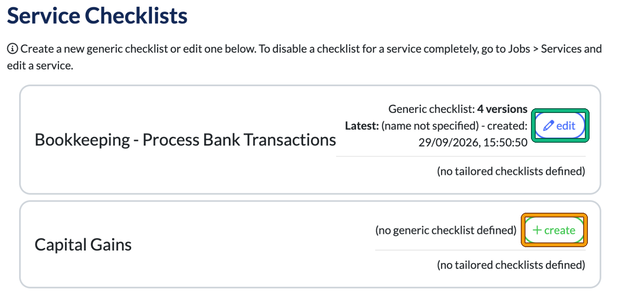
Simply hit edit, then tailor yours to your practice’s standards and processes.
In this example, we handle clients with US Dollar bank accounts, and I want a failsafe so that my Juniors don’t miss this as part of the preparation / reconciliation process.
Simply select + add point and then complete your new item.
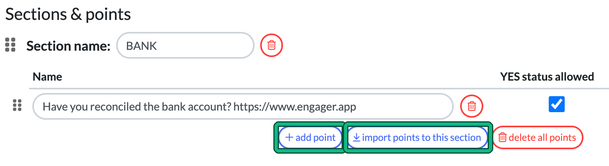
When you’re done, select Save new version from points above. Each save creates a new version of the checklist.
Import a Checklist
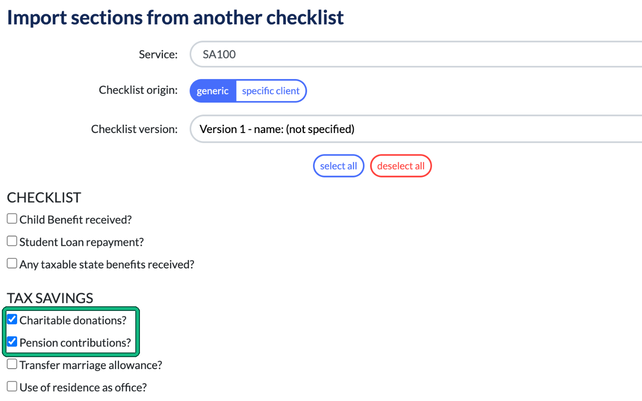
If you have a section of a Checklist that you’d like to use on another Checklist, we’ve got you covered there too: select import points to this section.
Then select where you want to take a portion of that Checklist from (Service:, Checklist origin: and Checklist version:), then simply tick off what you’d like to import into your NEW Checklist and select Import selected.
Custom or Tailored Checklists
You can create custom checklists against each individual client also. Super handy where you have just one or 2 clients that have bespoke needs, so you don't want to have to run these for 99% of your client base, just the anomaly.
What you need to do is set this at the client level. You can't create it in Settings > Checklists at a global level and apply it to the bespoke clients; you need to do it at the client level.
So locate the client in question, then on the left-hand side select Work > Tailored checklists. This works only for enabled services with globally enabled checklists.
From here, select + create next to the service.
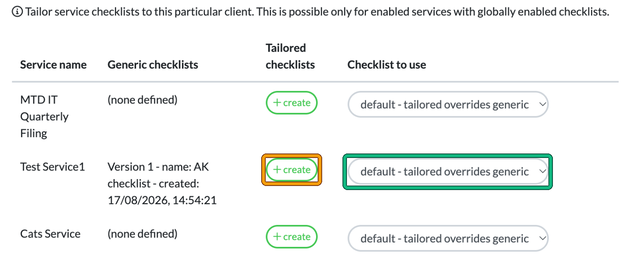
The new checklist starts with the content of the latest generic checklist. Add / remove your checks and then select Save new version from points above.
Just make sure to name the NEW checklist with set version name.

You don’t need to select anything for the Tailored Checklist to supersede the Generic: Checklist to use is already set to default - tailored overrides generic. Only change it if you want to force always generic, or turn the checklist off with none - checklist disabled.
We don't currently have a duplicate button for you to then apply the bespoke checklist to another similar client.