
Custom fields enable you to store any data you wish in Engager. Each custom field becomes a placeholder automatically and a filter in the client view.
We take a look at the uses and how to create the custom field in this video.
Custom Fields
Custom fields are incredibly powerful and useful. Think of them as an item that you can interact with on the system, to trigger events or include as placeholders within emails (Placeholders are like your mail merges).
We recommend watching the video above, as there’s a lot you can do with these fields and they will help tailor your Engager experience to match your Practice even more.
For a quick overview, here’s a quick example of how you could use a Custom Field.
In this example, I want to adjust my Self Assessment default pricing for a proposal, because the prospective client has self employed income as well as their salary and dividends. As the self employed income is outside of our standard Self Assessment pricing, I’m going to adjust accordingly.
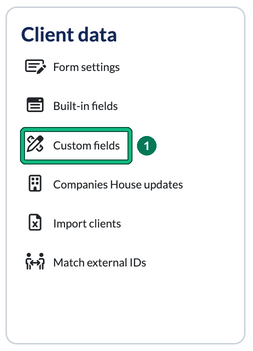
- Go to Settings and, under Client data, select Custom fields. This is where you can start populating these fields and entering in questions or information that you want to hold / ask the client.
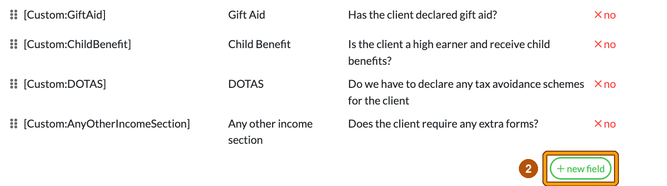
- Custom fields are grouped into sections. With the above example, I want to create a NEW Custom Field in my SA100 section, so I select + new field at the foot of that section. Your section names will be your own, and eventually they’ll reflect your practice’s needs as you tailor Engager. This opens Add field.
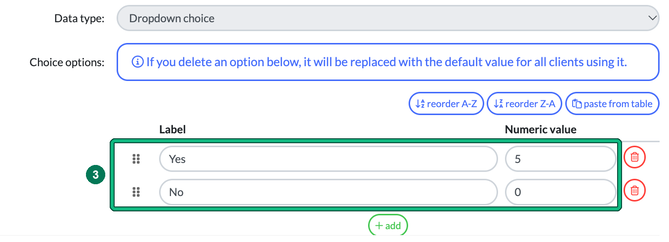
- This is where you can start to programme the behaviours that you want. In this example, I want to charge 5 times the amount of my usual self assessment fee of £100, if they are self employed. To do this, the existing Self Employed field, opened in Edit field, uses the Dropdown choice data type, and under Choice options each Label has a Numeric value: Yes is 5 and No is 0.
You’ll start to see how this all comes together in the pricing tool as well. If you ever get stuck with how something is calculated, head on back to your Custom Field and check how you’ve programmed the behaviours.
Bookkeeping Example
You can also play with some of the data values and types too, so if you wanted to have a scenario in Bookkeeping as an example, and wanted to charge the customer for an average number of transactions to reconcile per month:
- For the count, set Data type: to Whole number and the system will calculate accordingly. This could be your average number of transactions: enter this as your ‘Whole number’ for that month x the Default Value being £0.15p.

- Once you’ve had a play with your Custom Fields, come back to your pricing within the Service. Go to Settings and, under Jobs, select Services, then select the pencil icon on the service to open Edit service. On the Wizard tab of Pricing formula for the default fee period, select + add an operation.
- In the new row, choose field value: and then pull through your new Custom Field to interact with. You can be as complicated as you like if you need to.
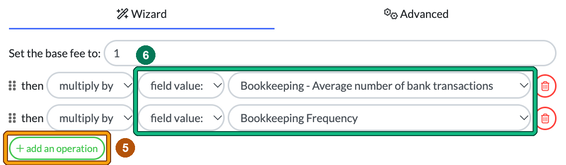
When your formula is ready, select Save at the bottom of Edit service. Selecting Cancel discards your changes without a warning.