
Module access lets you hide the parts of Engager a user doesn’t need, such as Deals, Time logs or Invoicing. You set practice defaults that apply to everyone, then fix individual modules on or off for particular users.
Only admins can change module access, and admins always have every module: they can’t be restricted. Module access sits alongside permissions, which control what a user can do inside the parts they can see. For permissions, see Creating and managing Users, Departments and their Permissions in Engager.
What each module controls
There are eight modules. Turning a module off for a user hides the following from them. The line in quotes is the module’s description on the Practice defaults tab.
- Dashboard: Dashboard in the top bar, and the dashboard and its widgets.
“Practice KPIs, charts and the reporting home screen.” - Clients: Clients in the top bar, client records, client pickers and the search in the top bar.
“Client records, contacts, custom fields and Companies House updates.” - Deals: Deals in the top bar, plus the Deals and Prospect form tabs on a client.
“Pipeline, deal stages and prospect forms.” - Proposals & LoEs: the Proposal, LoE & LoD tab on a client. This module has no item in the top bar.
“Proposals, letters of engagement and e-signing.” - Jobs: the Jobs menu in the top bar, plus the Jobs and Tailored checklists tabs on a client.
“Job workflows, services, checklists and job notifications.” - Time logs: Time logs and the timer in the top bar, and the Time tracking tab on a client.
“Time tracking, timers and timesheets.” - Invoicing: the Invoices menu in the top bar.
“Invoices, credit notes and payment tracking.” - Automations: Automations in the top bar, and automation triggers on jobs and clients.
“Triggers and automated actions across jobs and clients.”
Set the practice defaults
The practice defaults decide which modules every user gets, unless you’ve overridden a module for that user.
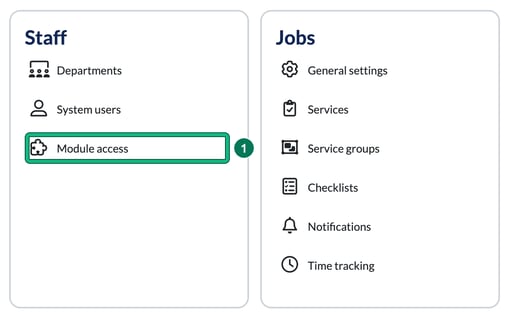
- Head to Settings > Staff > Module access.
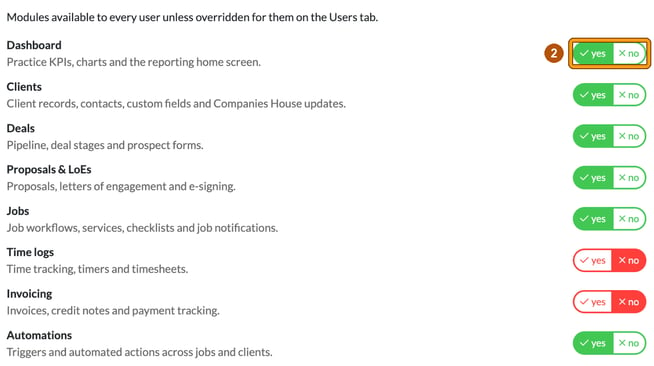
- On the Practice defaults tab, choose yes or no for each module. Then select Save at the bottom of the page. You’ll see Settings updated successfully.
Give a user their own access
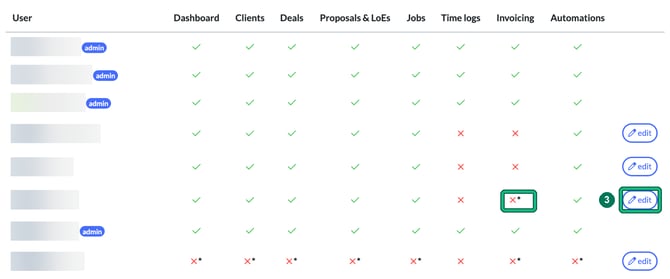
- On the Users tab, find the user and select edit at the far right of their row. The tab shows the modules each active user can actually use: a green tick means they have access and a red cross means they don’t. A * after the tick or cross means that module is overridden for that user, like the boxed cross below. Admins carry an admin badge, have every module and have no edit button.
- This opens Module access for <name>, which explains: “Modules set to default follow the practice defaults, including any future changes to them. Choose yes or no to fix a module for this user regardless of the defaults.” For each module, choose one of:
- Default: Yes or Default: No: follow the practice default, including future changes to it. The badge shows what the default currently is.
- yes: always on for this user.
- no: always off for this user.
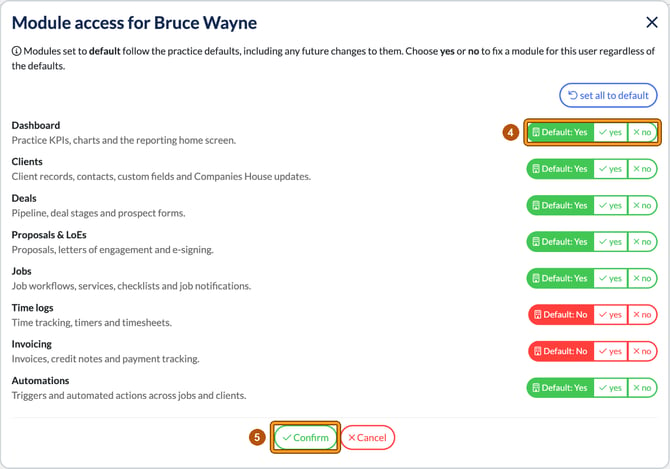
- Select Confirm (or Cancel to discard your changes). Any module you set to yes or no now shows a * in that user’s row. Confirm only closes the window: select Save at the bottom of the Users tab to keep the change. If you leave or reload the page without saving, the change is lost and no warning is shown.
Reset everyone to the practice defaults
To clear every per-user override in one go, go to the Practice defaults tab and find Apply to all users. Select Remove overrides for all users and confirm when asked, then select Save. Every user then follows the practice defaults again.
What users see
Modules that are turned off disappear from the user’s navigation. This is the top bar for a user with every module turned off:

The pages are blocked too, even if the user types the web address or follows a link. They see You don't have access to this page, with the message “This area is turned off for your account. Ask a practice administrator to enable it in Settings → Module access.”

Good to know
- Changes take effect the next time the user loads a page.
- Module access only applies to your internal system users. Client portal users aren’t affected.
- Settings is never hidden by module access. What a user can do there depends on their permissions.
- Hiding a module doesn’t stop work being assigned to the user. They still appear in assignee pickers and can still be assigned work in a module they can’t see.
- Notifications are still sent for hidden modules. Following the link takes the user to the blocked page.
- Invoicing entries only appear if the Invoicing module is on for the user and your practice has an accounting integration connected.
- The time tracking on/off switch has moved from Settings > Jobs > Time tracking to the Time logs module here, and that page now says so. Turning Time logs off for one user hides the Time logs menu, the timer in the top bar and the client’s Time tracking tab. Time fields on jobs and forms still follow the practice-wide Time logs setting. For the rest of the time tracking settings, see Time Tracking Logs and Staff Costs.

- In Settings > Staff > System users, the Modules column shows All for admins and, for everyone else, how many modules they have, for example 6 of 8. Hover over it to see which modules are off.