
What is it and what is it for
This powerful feature is for those of you who bill your customers by time, but it can also be used to track time spent on certain tasks. This could be really useful if you’re tracking whether your new Outsourcing team are actually adding value, or whether a new staff member clearly needs a little more support to get them up to speed. It has multiple uses.
You can also use this for staff to complete regular timesheets.
Whether time tracking is available is set per user in Settings > Module access, under the Time logs module.
Set up your defaults
The first thing we need to do is set up our defaults in Engager.
- As always, head to Settings > Jobs > Time tracking. This opens Time tracking settings.
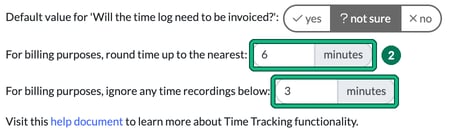
- Within this screen, you can dictate whether you’re charging for all time-based actions within your Practice, your rounding-up preference and also what time recordings under, say, 10 minutes aren’t chargeable:
- Default value for 'Will the time log need to be invoiced?': yes, not sure or no.
- For billing purposes, round time up to the nearest: a number of minutes.
- For billing purposes, ignore any time recordings below: a number of minutes. Anything shorter shows a billable time of zero.
Next Step: Our Staff
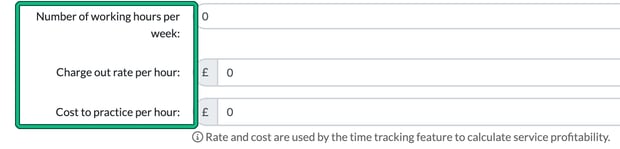
This is where you can enter your staff’s hours per week, their cost to you per hour, and also what their charge-out rate is for billing purposes.
- Head to Settings > Staff > System users and select the pencil icon (edit user) next to the staff member. This opens Edit user.
- Enter Number of working hours per week:, Charge out rate per hour: and Cost to practice per hour:. Rate and cost are used by the time tracking feature to calculate service profitability. Then scroll down and select Save at the bottom of Edit user, beside Cancel.
Please note: if you edit your own user, you’ll be logged out after saving and will need to log back in.
Please Note: Want to HIDE staffing costs?
We would recommend considering disabling the staff members’ access to hourly rates and charge-out rates. Let’s keep the office harmonious.
Permissions can only be changed for users whose Access level is USER. ADMIN users have all permissions, shown as ALL.
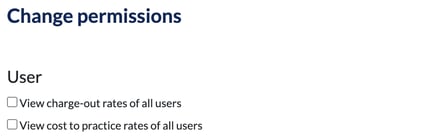
In Edit user, next to Permissions:, select change. In Change permissions, under User, deselect View charge-out rates of all users and View cost to practice rates of all users as needed, then select Confirm. This returns you to Edit user: scroll down and select Save, beside Cancel. The permissions are only saved when you save Edit user.
Also while you’re in Change permissions, just make sure you’re happy with the options under Time logs.
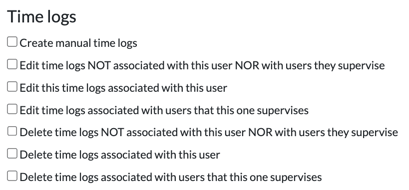
There are definitely a few things to consider with the above permissions, like editing other staff members’ logs or editing their own. We wanted to give you the choice and control over what they can and can’t do, especially with such a subject.
Now that’s set, how do we actually track time?
How to record time tracking
We’ve created a rather handy time tracking icon on your top bar, for ease of access and also to be a visual reminder that a timer is running and you could be billing a client!
- Select the clock icon in the top bar to open Recent activities, then select start new quick timer.
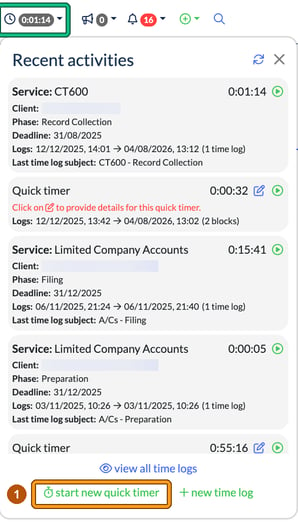
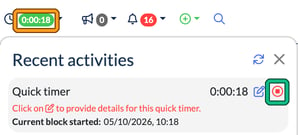
- Note how the time goes GREEN to indicate that it has started and is ongoing. You can now see it in your logs, as a Quick timer at the top of Recent activities. To STOP the timer, select the stop timer icon in red on the running entry.
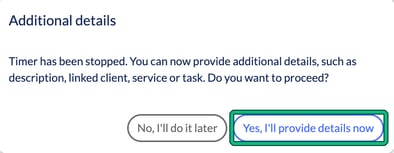
- When you STOP the timer, you’re presented with 2 options in Additional details: input the details now (what the purpose was, who it was for and what service) with Yes, I'll provide details now, or come back to the log later on to complete it with No, I'll do it later.
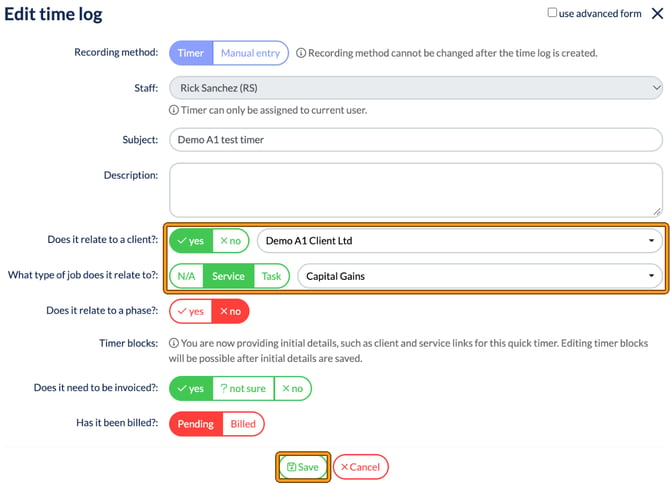
- In Edit time log, I can then enter the reason for the time log in Subject and Description, link it under Does it relate to a client? and What type of job does it relate to?, and say whether it’s billable under Does it need to be invoiced?. Then select Save.
Add a time log manually
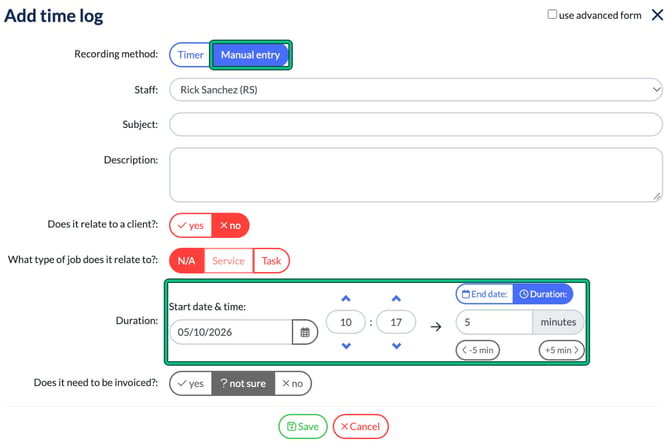
So that’s how you do a quick time log. This time around, let’s select + new time log in Recent activities. This opens Add time log.
This is a great way to enter any time logs that had been missed or forgotten. For example, a face to face consultation that happened outside of working hours, which I need to record in Engager so that we can document and then bill it.
Choose Manual entry as the Recording method:, then enter the Start date & time: and either an End date: or a Duration: in minutes (use -5 min and +5 min to adjust). If you choose Timer instead, the button becomes Save & start timer. The recording method can’t be changed after the time log is created. Then select Save.
The Time logs page
You can also create and view time logs by going to Time logs across your top bar.
As you can see, you have a whole suite of options and filters to play with here: Date range start and End, Staff, Supervisor, Client name, Task name, Service, Phase, Invoice status and Billing status, plus the + new time log, bulk actions, columns, change view and export to CSV buttons.

Can’t see a recent time log? Check the date range filters. The default date range may end before today, so newer logs won’t show until you change the End date.
It’s a great way to filter down into what needs to be billed, in case you miss any. If the Billing status is Pending, it shows in a handy RED colour.
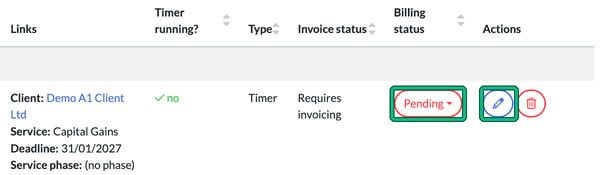
You may find that you need to add more time or more occasions to the logs, and that’s all possible within the edit options. A colleague can even add in their time against the same record, as there are times it won’t just be one team member working on one particular job.
Locate the pencil (edit) icon in the Actions column to open Edit time log. Head down to Timer blocks: and select + add. In Add timer stop, enter the Start date & time and End date & time, then select Confirm. Then select Save in Edit time log to keep the block. Selecting Cancel discards it.

Don’t forget that you can change the appearance of HOW you view the time logs as well. Perhaps you want to see how your team are performing and see what they’ve billed, or perhaps you want to hone in on an individual’s billables.
Head to change view and select the option you want: Table view, Timeline view, single day, multiple employees or Timeline view, multiple days, single employee.
Remember, if you want more in-depth reporting, we’ve got export to CSV, so you can have a play and build your own reports in Excel.
Track time in a job
Finally, you can also track time within the job cards, so when you’re working on a specific task or service, you can start a timer and this will track against your Estimated time allotted for that particular Phase.
You’ll find that most staff will start their timers here within the job. In the job’s Phases table, select the play button under My spent time for the phase you’re working on. The table also shows Estimated, All staff's spent and Remaining time, and any Time not assigned to a phase.
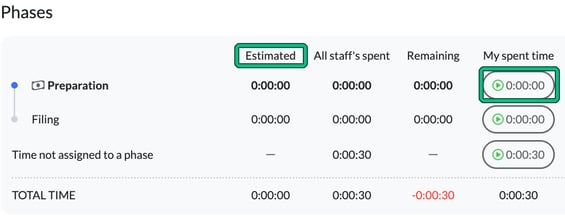
If you haven’t set up Estimated time per job phase, head into Settings > Jobs > Services and select the pencil icon in the Actions column to open Edit service. Head down to your phases and set Default budgeted time: in hours and minutes for each one.

We’re always looking to expand on our Features and we’ll be looking at Reporting soon, for Time Tracking and Logs.