
OK, now you’ve got your practice’s preferences and workflows up and running - now comes the biggy - the Import of existing clients
Following these steps is going to be crucial to you and getting everything firing on all cylinders - you’ve set the foundations, now let’s get your clients in and using Engager for the first time.
Quick heads up - DO NOT PANIC - if you’ve already jumped AHEAD of the 10 steps and got your automated emails set up, the system will not randomly fire out 100s of email reminders to your clients once they’ve been imported - the emails will trigger, but they will be safely stored in the Automated
PRE-CHECKS *please please please read*
To have the smoothest possible import-experience, please ensure you note the following - this is based on experiences from existing customers:
- Company Number for LTDs / Charities - make sure you include this in your import. Although it's technically not a mandatory field in the Import sheet, if you do import without the company number, the Companies House function and sync will not work
-
Duplicate Emails -The system will reject use of a duplicate email. If the Primary Contact on the LTD is on the Individual Sole Trade tab, this is fine as we'll match match and link the details anyway so it's not an issue.
- Shared emails - it's better to remove these and correct once the data is in Engager - you can do this with 'related individuals' and 'related businesses'
-
Mirror Image - the biggie - do not Import your data if you have skipped the getting started guide!
The simplest way to think of the import is that your Engager account must match your previous system - we don't know the name of your checklists or what's included, we don't know your staff or what steps you're currently on in your Year End stage. We might not even have a Home (field) for your new data to land, so don't do it - don't jump ahead as you'll be frustrated when things don't go smoothly. - Import all client data in one go - the system is not designed to handle an import for say sole traders, then an Import for LTDs. Please create a master import for ALL CLIENT TYPES
- Status Active! Do you want to turn your services ON when importing? Of course you do! So, make sure you include the following in your Import File Creating. Look for STATUS
Ready?
We’ve created a Client List for you to use as a template - it shows exactly what we’re looking for and what CAN actually be imported, so let’s begin
Head to Settings - Client Data - Import Client - Generate Import form
We've expanded on what can now be imported so you'll see that you can now bring through Services, Custom Fields etc- super handy!
Start selecting which fields are important to you to move over into Engager.
Top Tip - EXPAND THE CHEVRONS TO INCLUDE MORE DATA
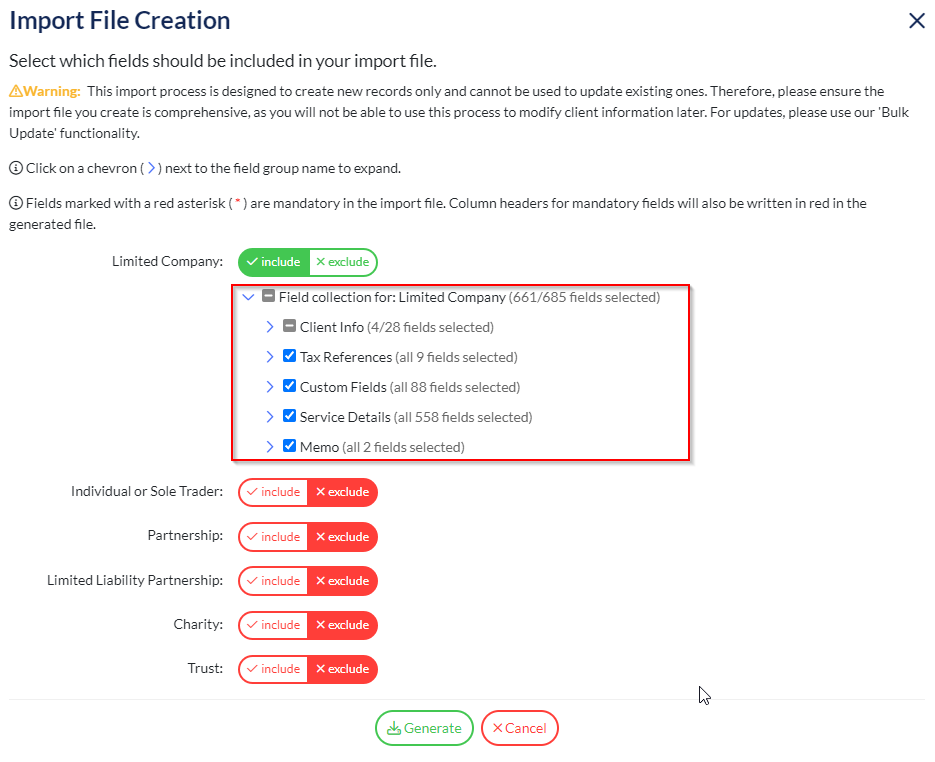
If you select the chevrons, you'll see even more detail that will be included on your excel sheet to import on over.
Once you've generated the Import Form, you'll see every item that you can move into Engager. We've colour coded essential, mandatory fields in RED to make it easier and more obvious for you to use.
We've also included handy drop downs for you to use
Please note that we are mirroring your Engager account set up at this stage, so if you have a vast number of fields / phases and jobs assigned to etc, it's all going to appear in your Import Form ready to be updated.
We've worked on the Import tool so that you can import your clients, the custom fields, the workflows, the service details and deadline, everything for you to hit the ground running with your new Engager account
So, spend a bit of time with the import the Import tool, as it will save hours overall and make for a much smoother experience overall
If you miss any services off of the import, don't worry, we can get these turned on in the Bulk Edit tool
VITAL INFORMATN BEFORE IMPORTING
- Ensure that the company number is included on the import, otherwise you will need to manually sync your records to companies house
Bulk Enabling
Realistically for your LTDs, you’re going to be doing Year End, CS01, VAT and Self Assessments - let’s get these enabled asap
So, let’s start with the Year End service
In the Client screen, filter to the LTDs by locating Filters then locating - TYPE
Select Limited Company which will then filter just your Limited Company clients
Select ALL
Select Bulk Actions - Edit Client or Service data - this going to give you access to an endless list of options
You’ll see your select clients, so then select Service from the dropdown
Select the Service in question, so Limited Company accounts as we’re enabled the Year End service
Select from from Form Field - Enabled - Then select ENABLED
When up then select ‘Submit’ you’re enabled this service for all the select clients in bulk
Congrats! You’ve now enabled all your Limited Company accounts with your Year End service
From here, you can rest up and allow the Companies House job to run overnight and then your dates and deadlines will magically appear in your account, in the morning.
Bulk Enabling VAT
That’s a quick and easy one, what about VAT Returns - lots of differentials at play like VAT end periods and due dates. Here, I would spend some time segmenting your clients into the VAT periods, then Bulk enable the service per quarterly schedule.
So start like this, back into Bulk Edit - this time Form Field is FREQUENCY - Default Frequency so every 3 months
But ENABLE the service first like before:
Once enabled
Obviously if you know they’re Yearly, don’t include them in this.
So know you’ve enabled the VAT service for these clients and explained that these clients are on the quarterly schedule - well what about DUE Dates for it to populate your deadline
Top Top
Be clever with your time, you don’t want to be doing this one by one, so this is where you will need to double back on yourself, check your original data set and and GROUP your clients by VAT Quarter Ended. Once you’ve grouped your clients by VAT frequency
From Clients, select your clients that share the same VAT Schedule, so those that have Jan / April / Jul / Oct
Once selected Bulk Actions - Form Field - VAT Quarter Ended - then the requisite schedule like the example below:
Once Submitted, you’ve now updated the deadline frequency for this sub set of clients that have VAT enabled
The deadlines and due dates will now start to populate your Engager account.
Thank you for reading!
Comments
0 comments
Please sign in to leave a comment.