
Pricing your Proposals and more
Setting the right price is crucial. Let’s explore how to use the pricing features in Engager to create competitive and profitable pricing strategies.
For more insights to pricing metrics get this free guide Ultimate pricing Guide for Accountants and Bookkeepers www.engager.app/pg
With our pricing, you can be as creative as you like to ensure it matches your way of doing things, or, just keep it simple for ease of use. Remember, you can always override your defaults when on the individual client.
We want to accommodate all users and their preferences. Some users have a simple set up like Year End accounts is £1,000 a year, it covers everything they need. Others might have a ‘base fee’ of £1,000 but loathe having to deal with paperwork, so reflect that in your pricing when creating your proposal.
Any caveat to your base fee, can be replicated in our pricing feature. Don’t like paperwork? Increase the fee 0.5. Love working with Charities? Reduce the base fee by 0.2.
Getting your pricing set up in the system when starting out will make the task of sending out proposals on the fly a quick and enjoyable process.
Set up pricing on a service
Remember that EVERY service listed can have its own pricing structure if you need.
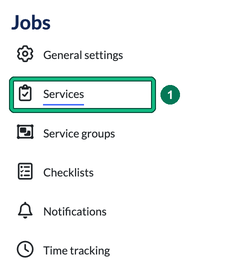
- Go to Settings and, under Jobs, select Services.
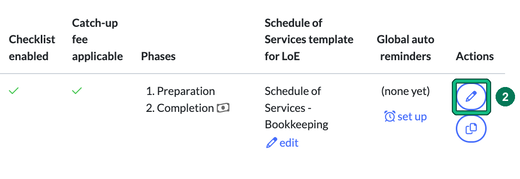
- Find the service you want to price and select the pencil icon in the Actions column. This opens Edit service.
- Scroll down to Default fee period. Is this a service that we’re billing monthly, yearly, quarterly etc? We’re telling Engager when to expect payment from our client for our services.

- For those that want to keep it simple, enter your base fee in Set the base fee to on the Wizard tab of Pricing formula for the default fee period. If you’d rather type the whole formula yourself, use the Advanced tab instead.
- For those that have the caveats to their price, let’s have some fun and start building out your exact specification. Select + add an operation.
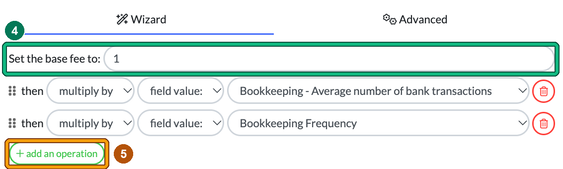
- In the new row, choose the operation (add, subtract, multiply by or divide by) and field value:, then select (select placeholder) to explore your list of options.

When your formula is ready, select Save at the bottom of Edit service. Selecting Cancel discards your changes without a warning.
Once you’ve selected the option, for example ‘Self Employed’, the system now knows that it needs to interact with this field later on in the system. It could be a Yes or No question.
Add your caveats to this section as you go. For example, I have a Self Assessment where I want to increase the pricing because the client is also self employed, has bad record quality and CIS submissions. All I’m thinking is ‘headache’ but also being positive ‘£££’. So I multiply the base fee by the Record Type, Self Employed, CIS Submissions and Record Quality field values.
At this stage you may be thinking, this is great but what am I really asking the system to do with these caveats? We need to set some rules and logic in answer to these caveats.
Set the rules in your custom fields
The ‘field values’ that you’re asking the pricing to interact with are located in Settings > Client data > Custom fields.
Custom fields are incredibly powerful and useful. Think of them as an item that you can interact with on the system, to trigger events or include as placeholders within emails (Placeholders are like your mail merges).
We recommend watching our tutorial on these as there’s a lot you can do with these fields and they will help tailor your Engager experience to match your Practice even more: Using Custom Fields.
For a quick overview, here’s a quick example of how you could use a Custom Field.
In this example, I want to adjust my Self Assessment default pricing for a proposal, because the prospective client has self employed income as well as their salary and dividends. As the self employed income is outside of our standard Self Assessment pricing, I’m going to adjust accordingly.
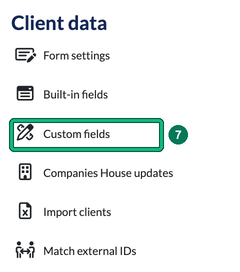
- Go to Settings and, under Client data, select Custom fields. This is where you can start populating these fields and entering in questions or information that you want to hold / ask the client.
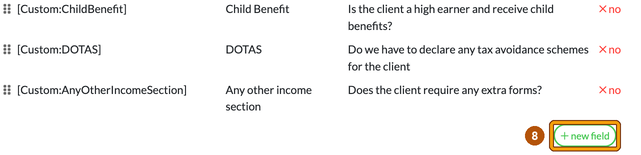
- Custom fields are grouped into sections. With the above example, I want to create a NEW Custom Field in my SA100 section, so I select + new field at the foot of that section. Your section names will be your own. This opens Add field.
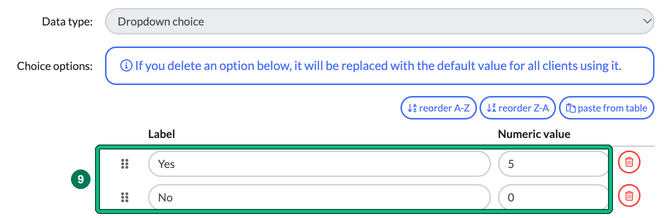
- This is where you can start to program the behaviours that you want. In this example, I want to charge 5 times the amount of my usual self assessment fee of £100, if they are self employed. To do this, the existing Self Employed field, opened in Edit field, uses the Dropdown choice data type, and under Choice options each Label has a Numeric value: Yes is 5 and No is 0.
You’ll start to see how this all comes together in the pricing tool as well. If you ever get stuck with how something is calculated, head on back to your Custom Field and check how you’ve programmed the behaviours.
Bookkeeping Example
You can also play with some of the data values and types too, so if you wanted to have a scenario in Bookkeeping as an example, and wanted to charge the customer for an average number of transactions to reconcile per month, use the Whole number data type and the system will calculate accordingly.
This could be your average number of transactions: enter this as your ‘Whole number’ for that month x the Default Value being £0.15p.
Once you’ve had a play with your Custom Fields, when you come back to your pricing within the Service, you’ll see that you can select + add an operation then pull through your new Custom Fields to interact with. You can be as complicated as you like if you need to.
See it on the client
When you see all of the above come together, it will appear like this on the client's Step 5: Services & pricing. Each service's pricing factor fields appear below it. Fill them in and the Suggested fee: is worked out from your formula. For example, choosing 101-200 for the average number of bank transactions changed a Bookkeeping service's suggested fee from £1 to £200. Select the arrow to copy the suggestion into Selected fee:, and the Annual fee: follows.

Select explain under the suggested fee to see the Pricing formula: behind it.

The Selected fee: stays editable, so you can always override your defaults on the individual client.